Home » Posts filed under Level Guide
Tampilkan postingan dengan label Level Guide. Tampilkan semua postingan
Minggu, 24 Maret 2013
Battle Formation Guide Level 25
Final Battle.
Units:
- 12 tile(10) of archer
- 12 tile(10) of elite archer
- 12 tile(10) of defender
- 18 tile(10) of cavalry
Alternate formation with less units:
Units:
- 6 tile(10) of archer
- 6 tile(10) of elite archer
- 18 tile(10) of defender
- 14 tile(10) of cavalry
Have better formation? post it Here.
Battle Formation Guide Level 24
The perfect unit for this level were elite pikemen with special ability upgrade more than 3. If his ability occurs when he is facing a cavalry, he would hurt archer behind it and certainly kill the archer. But if his ability occurs when he is facing archer, then the cavalry would greatly wounded. Despite all that, this ability gave a pikemen to get always First Hit in the next turn. The higher the upgrade, the better the result.
Units:
- 17 tile(10) of pikemen
- 11 tile(10) of elite pikemen
- 25 tile(1) of archer
Have better formation? post it Here.
Battle Formation Guide Level 23
From this level, the guide would be based on a higher upgrade. at least, from now on, the upgrade level of all attack and defend would increased to 4 - 5.
Units:
- 8 tile(10) of pikemen
- 16 tile(1) of pikemen
- 9 tile(10) of archer
- 2 tile(10) of defender
- 3 tile(10) of cavalry
Have better formation? post it Here.
Battle Formation Guide Level 22
Units:
- 4 tile(10) of pikemen
- 14 tile(1) of pikemen
- 4 tile(10) of archer
- 1 tile(10) of elite archer
- 9 tile(10) of defender
Have better formation? post it Here.
Battle Formation Guide Level 21
Units:
- 3 tile(10) of pikemen
- 3 tile(10) of archer
- 9 tile(10) of elite archer
- 3 tile(10) of defender
- 4 tile(10) of cavalry
Have better formation? post it Here.
Battle Formation Guide Level 20
Use this if you want to kill all the aggressive unit.
Units:
- 8 tile(10) of pikemen
- 5 tile(1) of pikemen
- 1 tile(10) of elite archer
- 8 tile(10) of defender
Use this to hold the aggressive unit and kill the deffensive unit
Units:
- 1 tile(10) of pikemen
- 18 tile(1) of pikemen
- 1 tile(10) of elite pikemen
- 2 tile(10) of archer
- 2 tile(10) of defender
- 1 tile(10) of cavalry
Have better formation? post it Here.
Battle Formation Guide Level 19
Units:
- 4 tile(10) of archer
- 4 tile(10) of defender
- 15 tile(10) of cavalry
Have better formation? post it Here.
Battle Formation Guide Level 18
Follow the story line. you can't win... However, some player out there can manage to win this level, but it won't change anything...
Units:
-
Still, if you persist to beat this level and suffer great loss in your number, then... here the formation:
Units:
- 54(10) of defender
Many formation could be won this level, this is just the alternatives. you could mixed your units, not just defender.
Have better formation? post it Here.
Battle Formation Guide Level 17
Units:
- 9 tile(10) of archer
- 1 tile(10) of elite archer
- 10 tile(10) of defender
Have better formation? post it Here.
Battle Formation Guide Level 16
Defender were pretty good against archer.Put some upgrade on them.
- 7 tile(10) of archer
- 11 tile(1) of atcher
- 14 tile(10) of defender
Have better formation? post it Here.
Sabtu, 23 Maret 2013
Battle Formation Guide Level 15
Defender were very strong. Even joint attack between 3 units altogether won't kill him.
Do you see blank line in the top tiles? Never put a decoy or flanking unit in the top, because it would makes enemy having two target decoy at a time. it would not turns out like what we want it to if the enemy have a chance ruined out formation plan.
Units:
- 4 tile(10) of pikemen
- 23 tile(1) of pikemen
- 4 tile(10) of archer
- 4 tile(10) of elite archer
Have better formation? post it Here.
Battle Formation Guide Level 14
This is the last battle in the desert.
- 4 tile(10) of pikemen
- 12 tile(1) of pikemen
- 2 tile(10) of elite archer
Have better formation? post it Here.
Battle Formation Guide Level 13
Zero casualties.
Units:
- 1 tile(10) of archer
- 2 tile(10) of elite archer
Have better formation? post it Here.
Battle Formation Guide Level 12
Don't underestimate the enemy even if they weak, keep using strategy.
- 1 tile(10) of archer
- 4 tile(10) of elite archer
Have better formation? post it Here.
Battle Formation Guide Level 11
Pretty much flanking here.
Units:
- 3 tile(10) of pikemen
- 3 tile(10) of archer
- 15 tile(1) of pikemen
Have better formation? post it Here.
Units:
- 3 tile(10) of pikemen
- 3 tile(10) of archer
- 15 tile(1) of pikemen
Have better formation? post it Here.
Jumat, 22 Maret 2013
Battle Formation Unit Behavior
Moving Behavior
1. This is a turn-based game and in the beginning of every battle, your unit always moves first.
2. Queue between all of your units is start from front to back, and from each line, the top unit moves first, followed by unit below him. The enemy units have the same behavior.
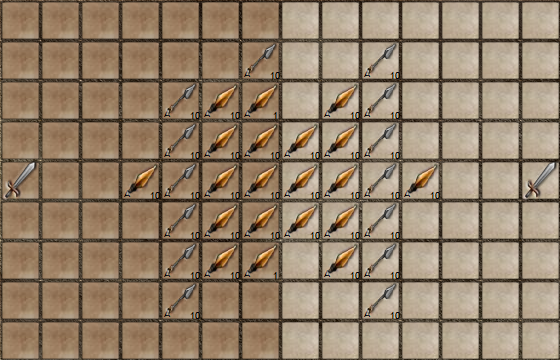
3. Units would keep moving forward until he encounter other unit, and attack. For archer, he would stop and attack if there are enemies in his shooting range.
4. If there is no one in front of him, the unit would move forward until reach the edge. If still no units encounter him, he would turn to move closer to the general.
5. The unit would never turn to other lines unless he reaches the edge. The unit would also never move backwards.
Attacking Behavior
1. If a unit encounter more than one enemies, he would choose the least health and attack it, no matter what. You could use this behavior in your tactic and strategy. See <inner link: strategy guide> and <inner link: tactic guide>.
2. Units with Defensive stance would never move from their spot, no matter what. This also could be used in tactic and strategy. See <inner link: strategy guide> and <inner link: tactic guide>.
3. Archer doesn't attack diagonal so did melee unit.
4. The difference between 1 and 10 units in one tiles is the attack would multiplied with the total units, but not the defend.
5. Damage taken from a tile is taken by first unit. If his health wasn’t that much, the damage is given to the second unit, this would keep going until the damage is runs out or no unit in tiles can bear the damage which means the tiles would be empty.
Battle Formation Guide Level 10
It's just easier to just kill them all instead of just the general. Here the formation:
Units:
- 10 tile(10) of pikemen
- 7 tile(10) of archer
Have better formation? post it Here.
Battle Formation Guide Level 9
this level is the last time you could train units before you going deeper in the desert, train as much as you can, but the question is what units you should train? If you play normally, then I suggest to train three quarter of pikemen, and a quarter of archers. But it's up to your strategy and unit mastery.
still confuse to choose? see the formation guide at desert level:
- Battle Formation Guide Level 10
- Battle Formation Guide Level 11
- Battle Formation Guide Level 12
- Battle Formation Guide Level 13
- Battle Formation Guide Level 14
- 30 tile(1) of pikemen
- 3 tile(10) of pikemen
- 1 tile(10) of archer
See the units in your most left (top) and in the most right (bottom)? they intended to kill the general.
If you use both melee unit, take the both side would has no difference. but if you use 1 melee and 1 archer which the archer behind the melee unit, then take the right only. If you use left side, then you'd lose one turn of the archer to attack. Read Moving Behavior at Battle Formation Unit Behavior. See point number 2.
If you want to kill all enemies, use this formation:
Units:
- 9 tile(10) of pikemen
- 2 tile(1) of pikemen
- 7 tile(10) of archer
Have better formation? post it Here.
Battle Formation Guide Level 8
Use this formation to eliminate the right and left side of the enemy, then the pikemen and the archers in your right side would kill the general.
- 12 tile(1) of pikemen
- 5 tile(10) of pikemen
- 5 tile(10) of archer
- 1 tile(10) of elite archer
But if you want to blood bath and farm resources, use this formation:
Units:
- 11 tile(1) of pikemen
- 5 tile(10) of pikemen
- 7 tile(10) of archer
Have better formation? post it Here.
Battle Formation Guide Level 7
Units:
- 3 tile(10) of pikemen
- 7 tile(2) of elite archer
Killing only the enemy general would make you pass. Defend the mid and go for the general, but I'd rather go for the second option to farm resources which looks like this:
Units:
- 5 tile(10) of pikemen
- 1 tile(5) of pikemen
- 7 tile(2) of elite archer
- 1 tile(10) of elite archer
Have better formation? post it Here.
Langganan:
Postingan (Atom)